Citrix Director standard configurations are fine for most cases, but when you want to configure Director so it’s a little more user friendly here are some changes I have made.
Prepopulate the Domain field.
“C:\inetpub\wwwroot\Director\Logon.aspx”
Edit LogOn.aspx file.
Add Text and ReadOnly.
<asp:TextBox ID=”Domain” Text=”Domain.com” readonly=”true” runat=”server” CssClass=”text-box”
Decrease the web page load time.
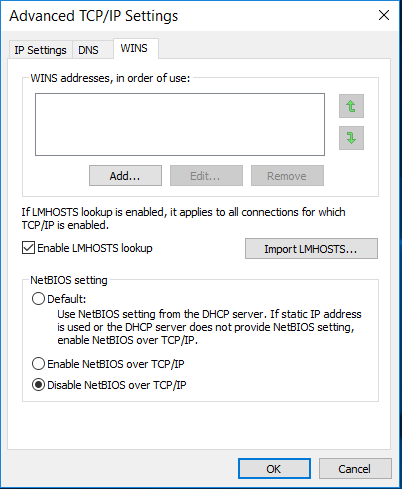
Disable NetBIOS over TCP/IP in the network adapter properties.
Go to Control Panel > All Control Panel Items > Network and Sharing Center
Right Click on the Adapter and choose Properties. Select Internet Protocol version 4 and Click Properties.
Modify 32bit and 64bit ASPNET.CONFIG files.
<generatePublisherEvidence enabled="false" />
Open the file C:\Windows\Microsoft.NET\Framework\v4.0.30319\aspnet.config.
The 64-bit config file located at C:\Windows\Microsoft.NET\Framework64\v4.0.30319.
Add <generatePublisherEvidence enabled="false" /> below <runtime>
Change the default IIS Site to Director login page so users don’t need to remember the full URL.
Allow access to all your XenDesktop Sites and XenApp Farms.
- Service.AutoDiscoveryAddresses = SiteAController,SiteBController
- Service.AutoDiscoveryAddressesXA = FQDN or IP of you XenApp 6.5 XML/ZDC
- Service.MultiSite = true.
Change search options for additional domain lookup.
- Add the name of the domain to the list, as shown in this example: Connector.ActiveDirectory.Domains = (user),(server),ENDUSERDOMAIN
